

How To Set Up Blink App
Blink setup is easy, just delight follow these steps in order.
Installation of the Glimmer app and devices follows the same sequence regardless of the operating organisation your device is running. At present let's get started!
Setup Sections
I. Installing the Blink app & Creating your Account
2. Setting up the Sync Module
Three. Adding camera(s)
The most recent version of the Blink app is always available in your app shop.
Glimmer supports most smartphones, tablets, and many Alexa enabled products.
Follow the link or scan the QR lawmaking to admission the most recent Glimmer app download.
Blink version half dozen.9.0
for iOS 12.5 and later.
![]()

Blink version six.9.2
for Android v5.0 (Lollipop) and later.
![]()

Glimmer version half dozen.9.2
for Fire OS v5.1 and subsequently.


To Get Started with the Blink app, follow the instructions below:
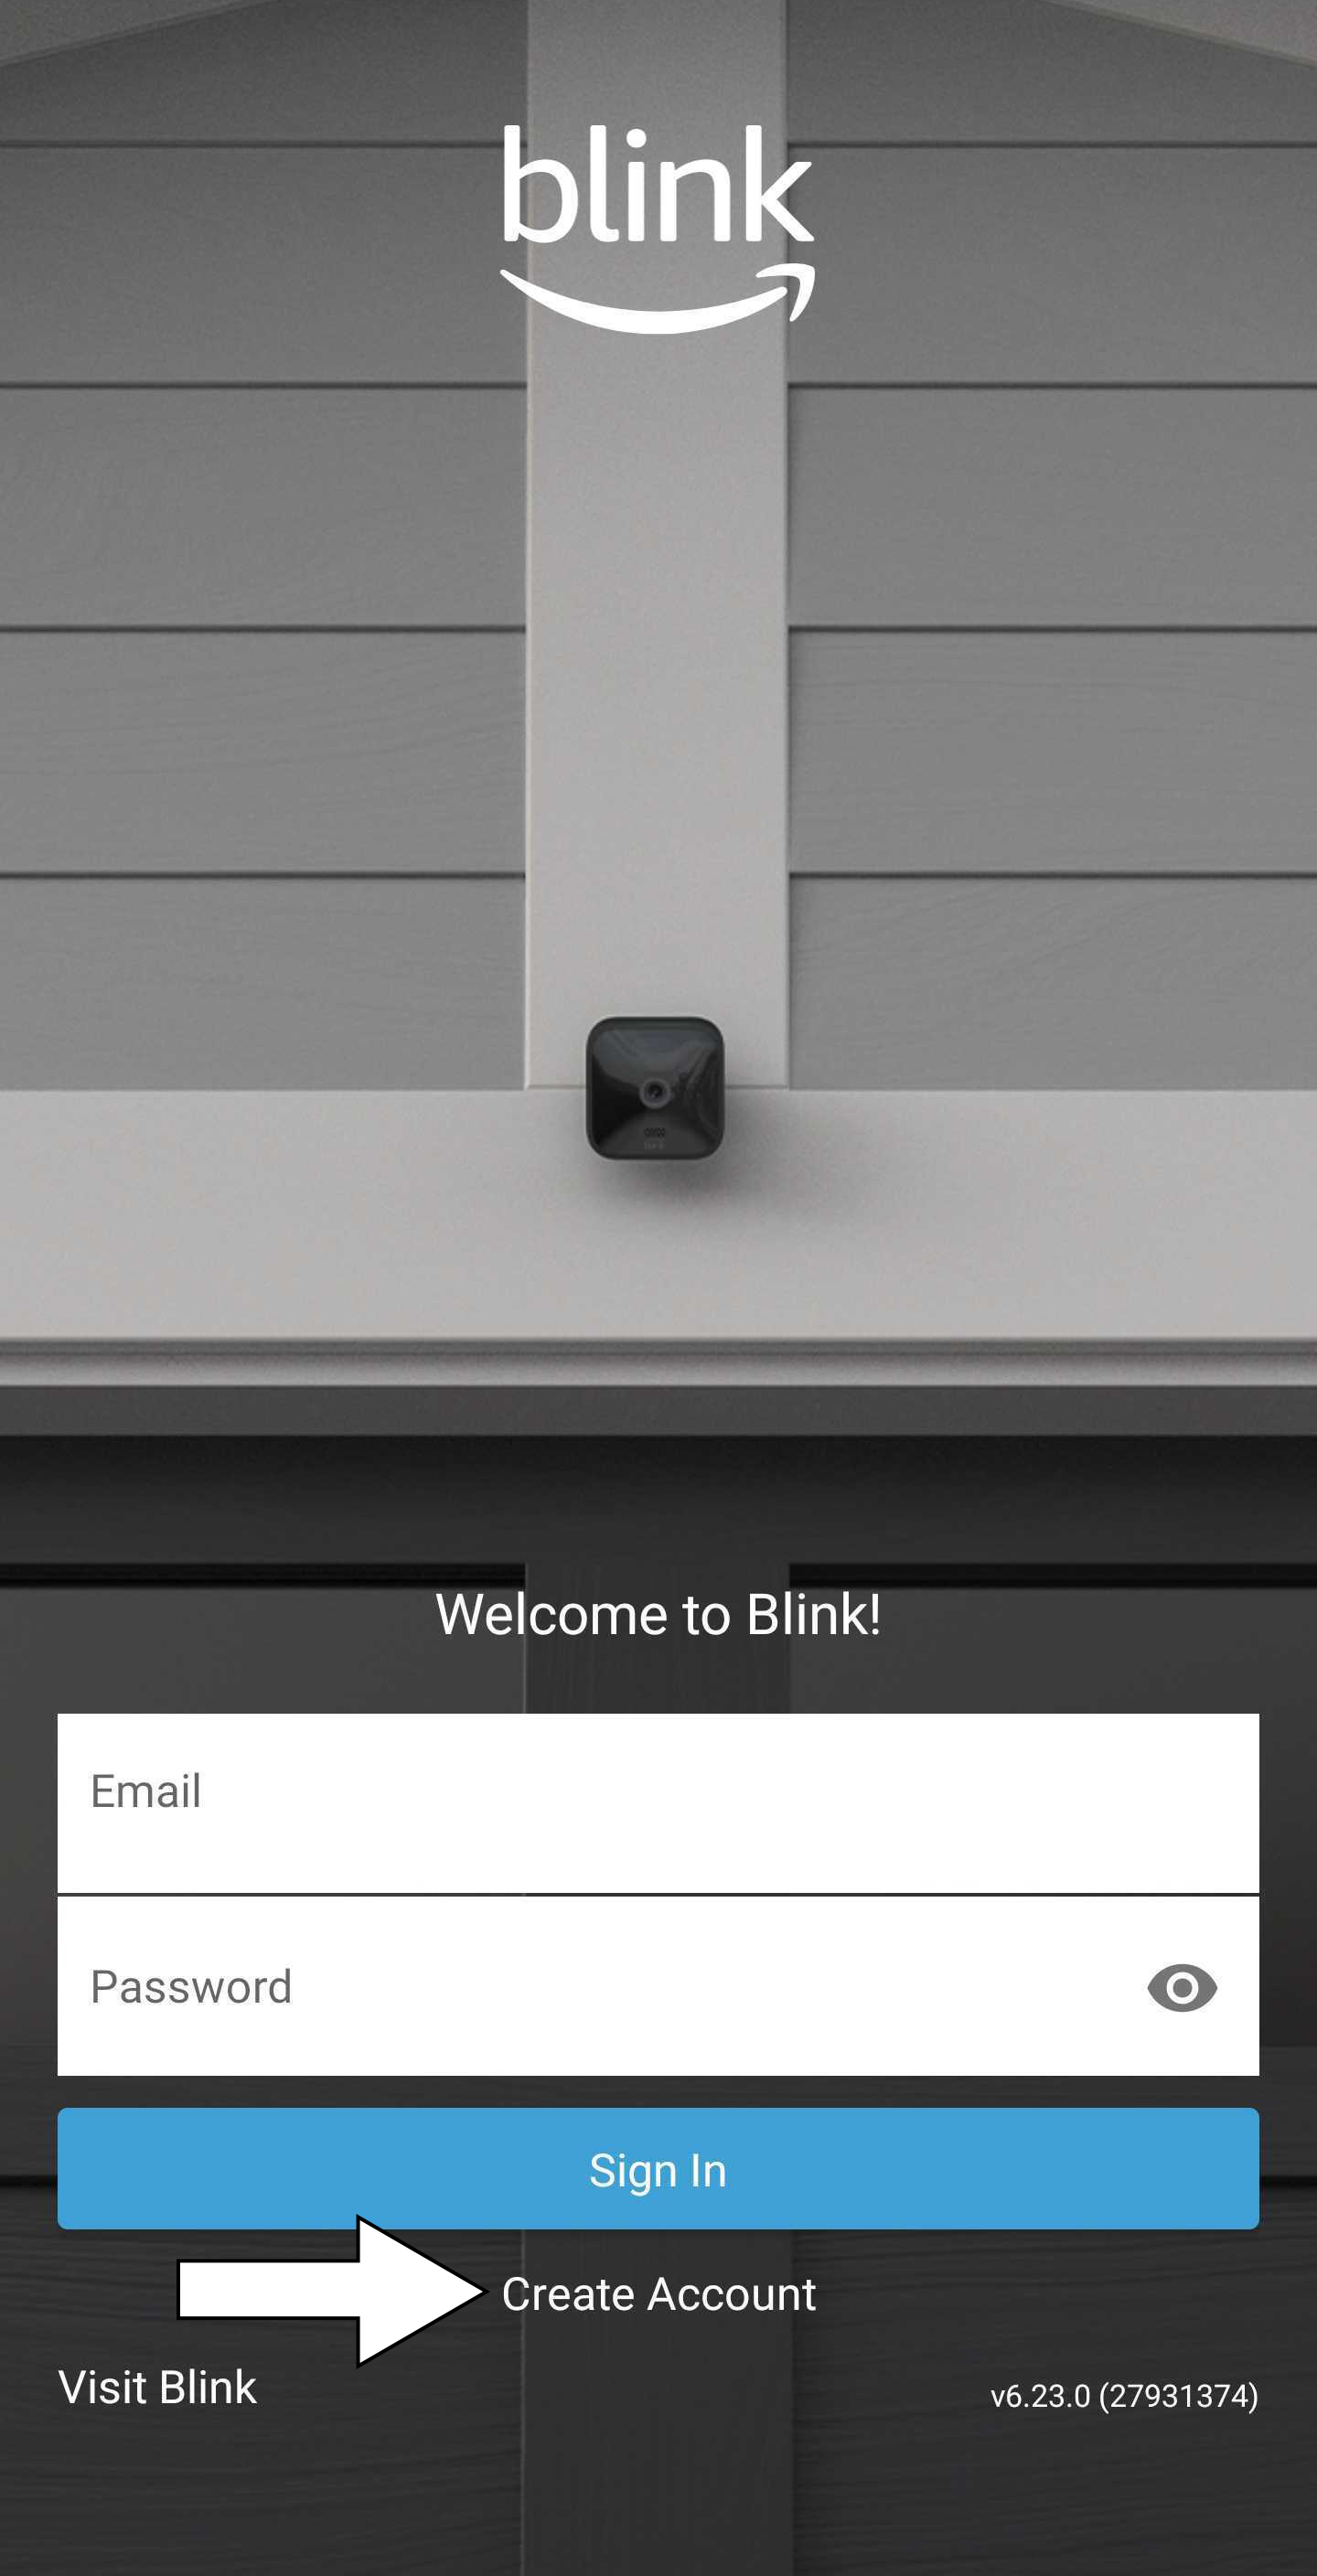
1. Launch the Blink App and tap Create Account at the lesser of the screen.
2. Select your country from the drop-downward carte and tap Adjacent.
| | |


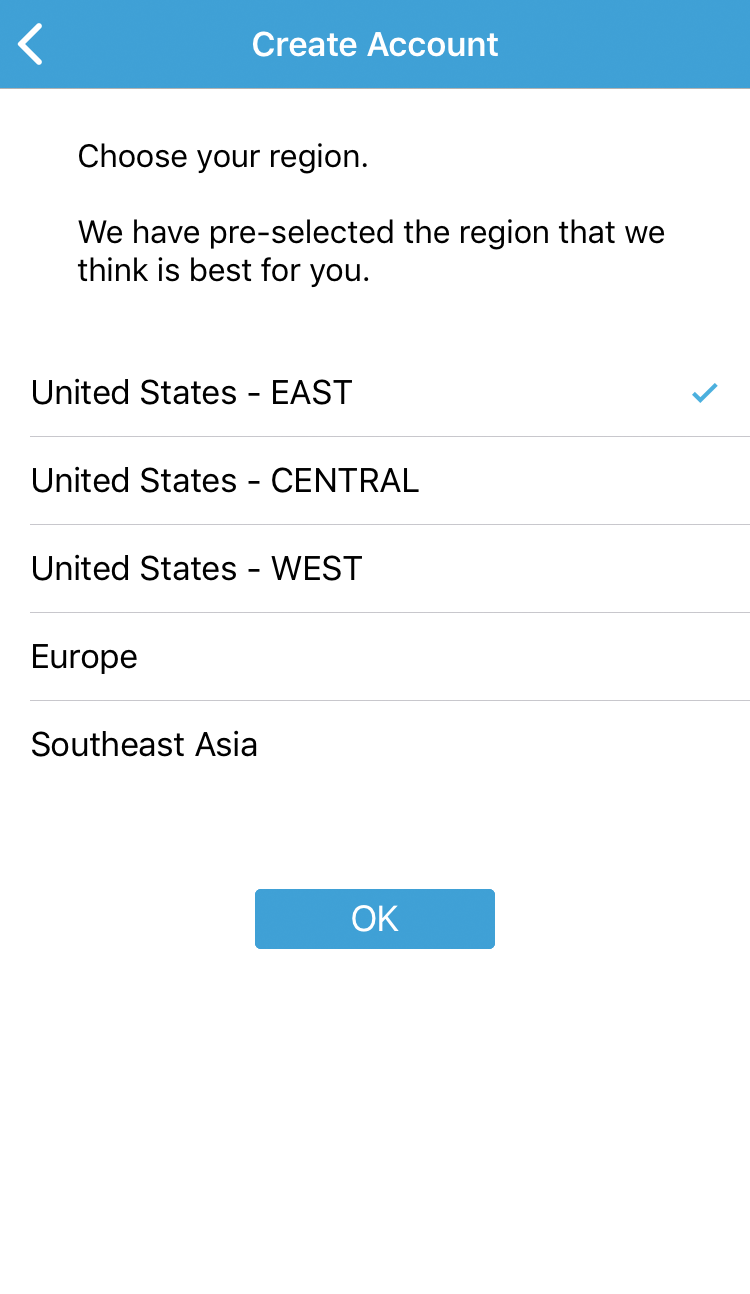
iii. Ostend your region and tap OK.
A region is pre-selected based on your IP address.
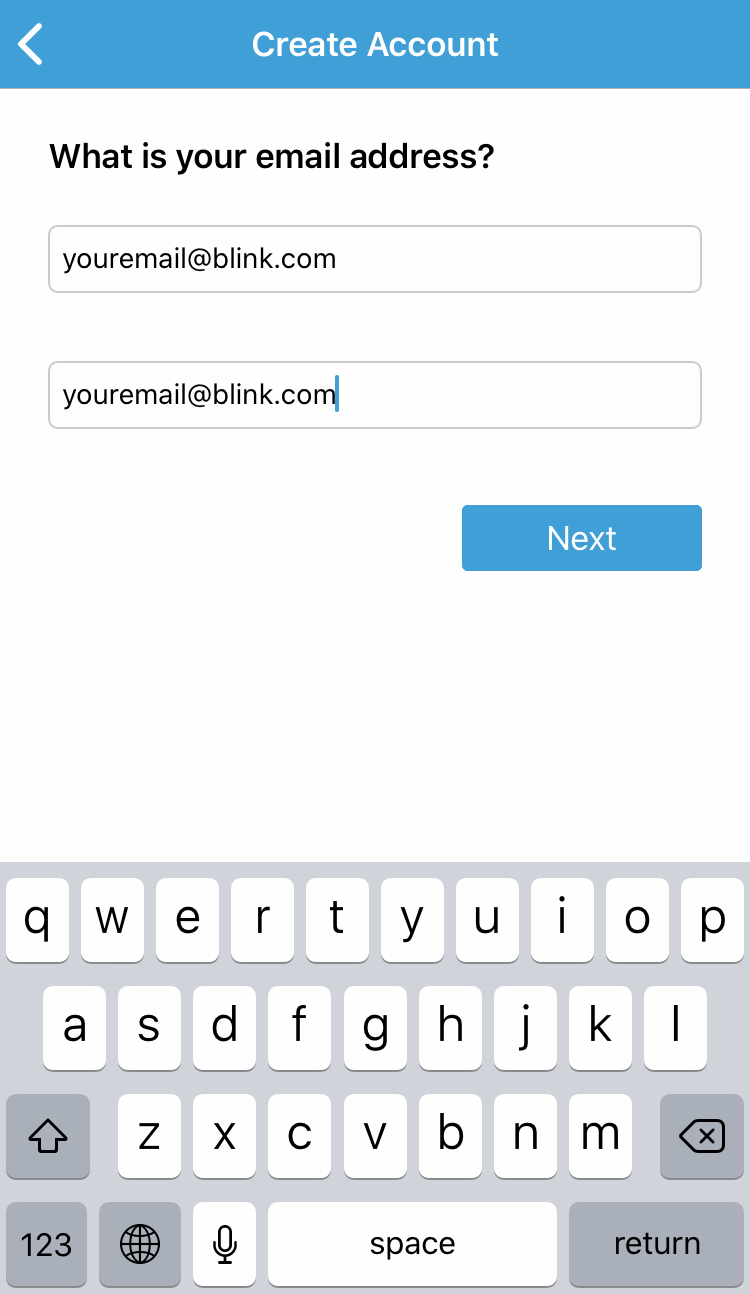
4. Enter a valid electronic mail accost, and tap Side by side.
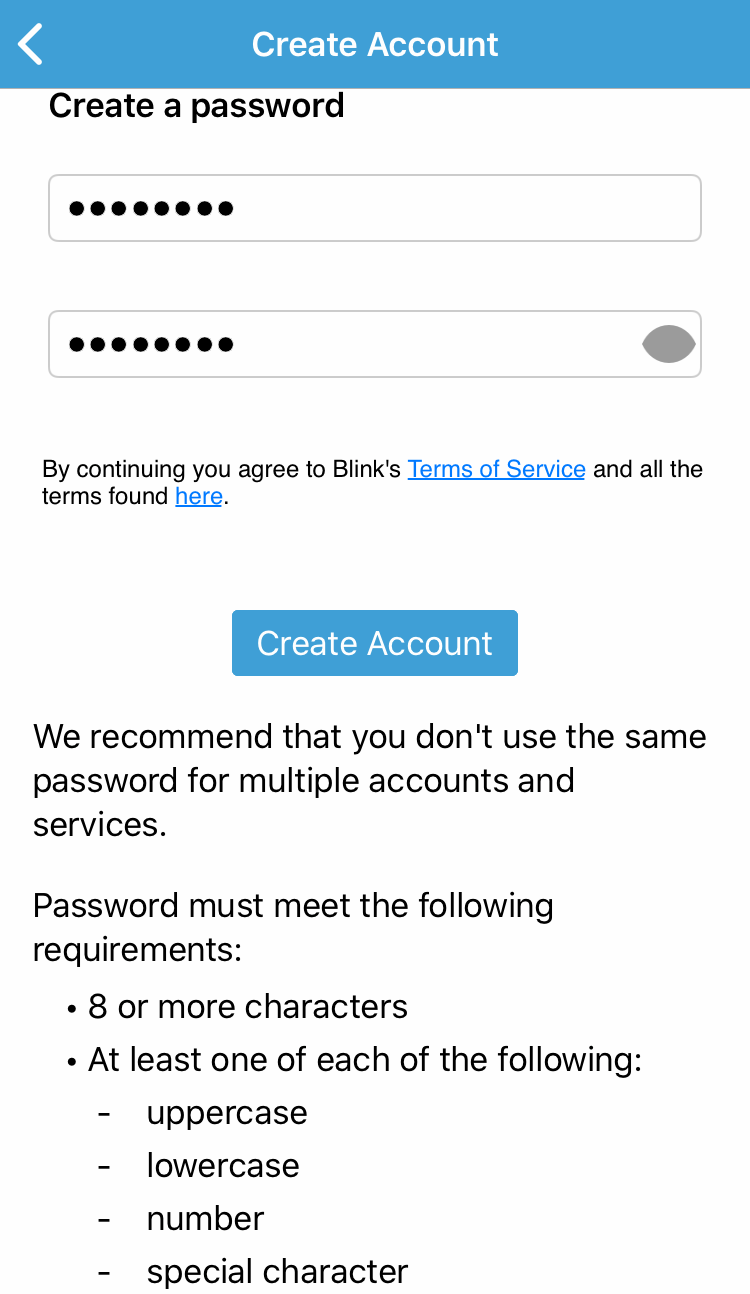
v. Create a password and tap Create Account.
The countersign requirements are listed at the lesser of the screen.
6. Complete the multi factor account verification procedure.
Enter the PIN from the email we sent you lot and tap "Verify".
 |  |
| New Account Pin | New Business relationship with Expired PIN |
Pivot codes are valid for 40 minutes. Afterward one minute, the "Resend PIN Code" choice appears.
When yous have verified your email address, the app configures your SMS text telephone number to send alerts and for account verification.
When you are presented with a Telephone number entry screen, tap the Telephone number entry line to bring upwards a keypad.
Select your country code from the bill of fare that is displayed when you lot tap the flag icon next to the Phone number entry line.
Enter the telephone number you wish to utilize for device verification and tap "Next".
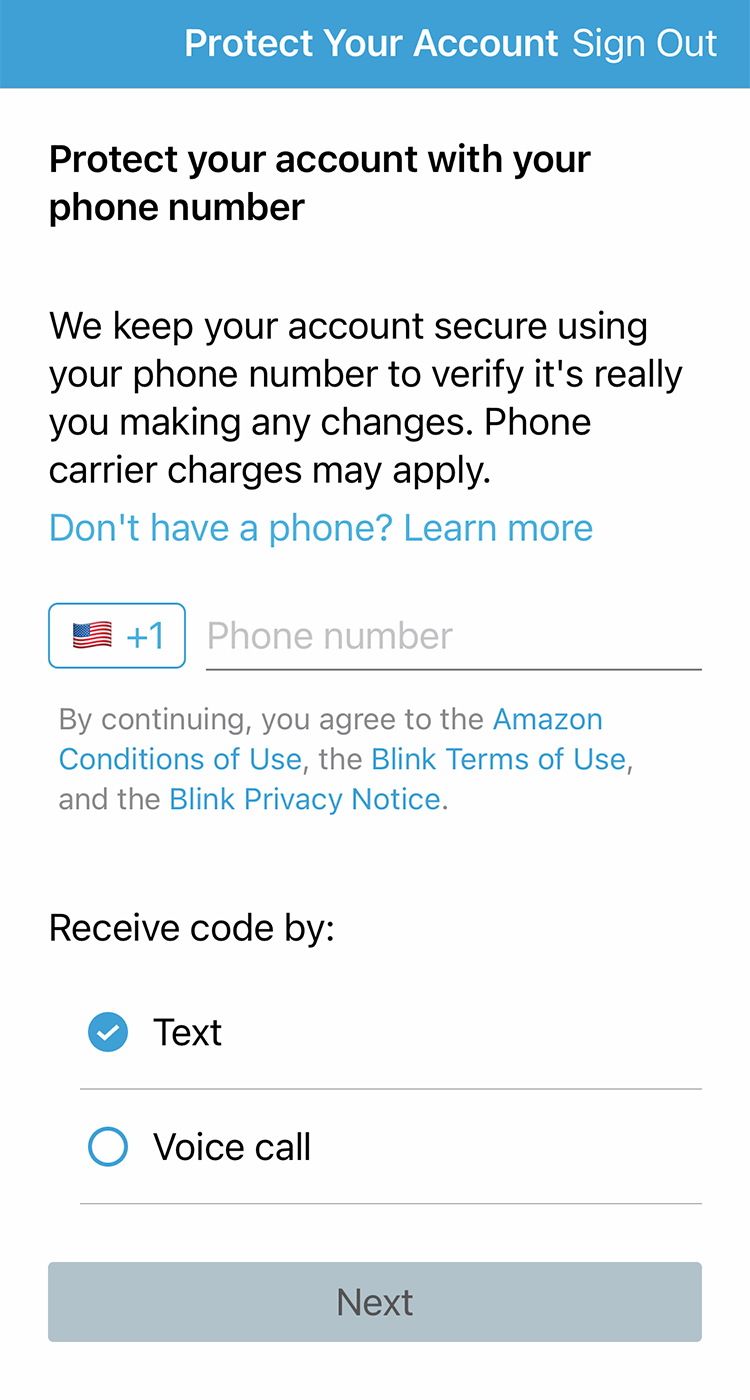
If you adopt to not use SMS, the PIN code tin be read to you by an automated Voice phone call instead.
To choose this option, select "Vox call" and tap "Next".
Note: The SMS text pick should only be used with mobile phone lines and volition non piece of work with landlines. Blink ONLY uses this number to positively associate your device to the Glimmer app - to make sure the person making changes is you. Your information is private and will non exist used for boosted purposes or shared with third parties.
Click to learn why nosotros demand your phone number. Contact Customer Service if yous don't take a phone number.
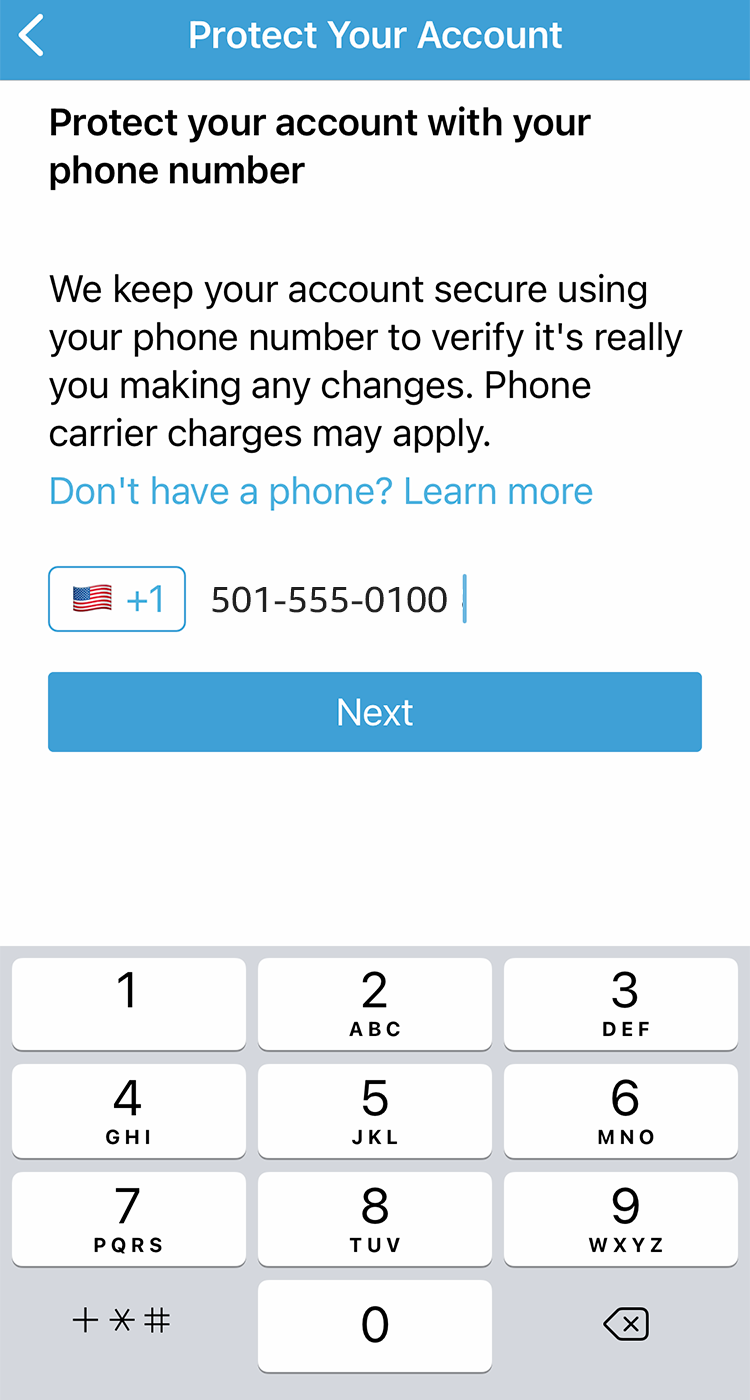
At this bespeak, an SMS Text message containing the Pivot lawmaking is sent to the telephone number, and the Pivot entry screen is opened for you.
Example SMS Text Message:
Your Blink verification lawmaking
is:
Enter the Pivot from the SMS Text message nosotros sent you lot and tap "Verify".
Pin codes are valid for forty minutes. Subsequently one infinitesimal, the "Resend Pin Code" option is presented.
 |  |
| Verify SMS Pivot | Verify with Pin |
When the verification step is complete, you are prompted to link your new Blink business relationship to your Amazon account, past tapping on the "Link Accounts button". This is an optional stride.Click to learn how to link your accounts at a later on time.
You also have the option to select "Skip" which will take you to the home screen, without linking your accounts.
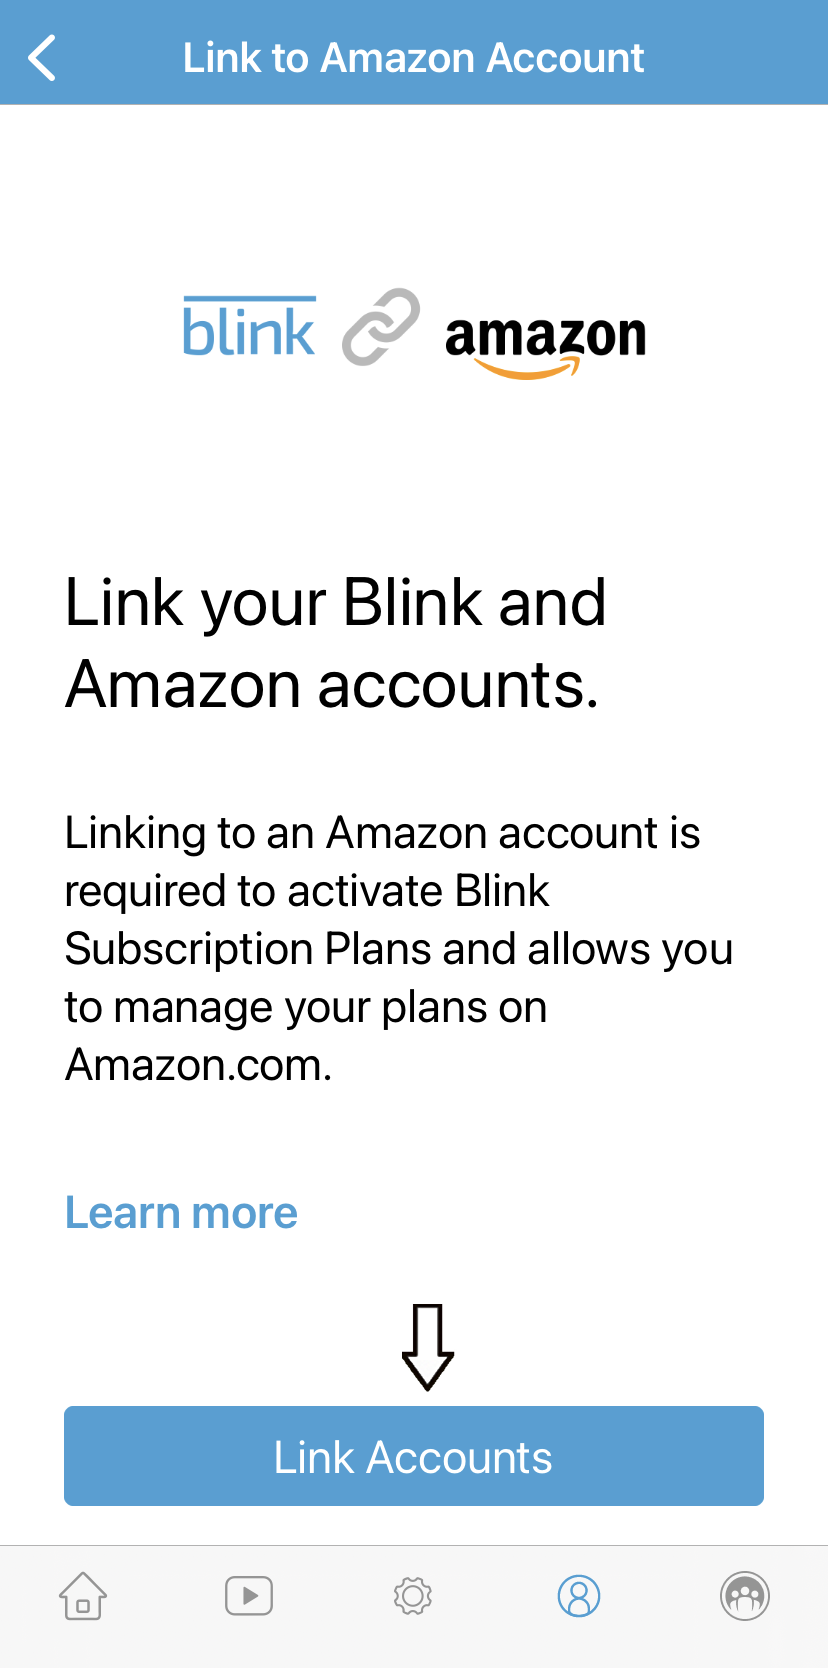
Then sign into your existing Amazon business relationship or create a new i if needed. The link is then established betwixt accounts and click Next.
Y'all volition so be able to keep to the next step of setting up your sync module.
II. Setting up the Sync Module
Thanks to Glimmer'southward wire-free design, the Sync Module is the only part of the arrangement that will demand to be plugged in!
Add a Sync Module and create a organization
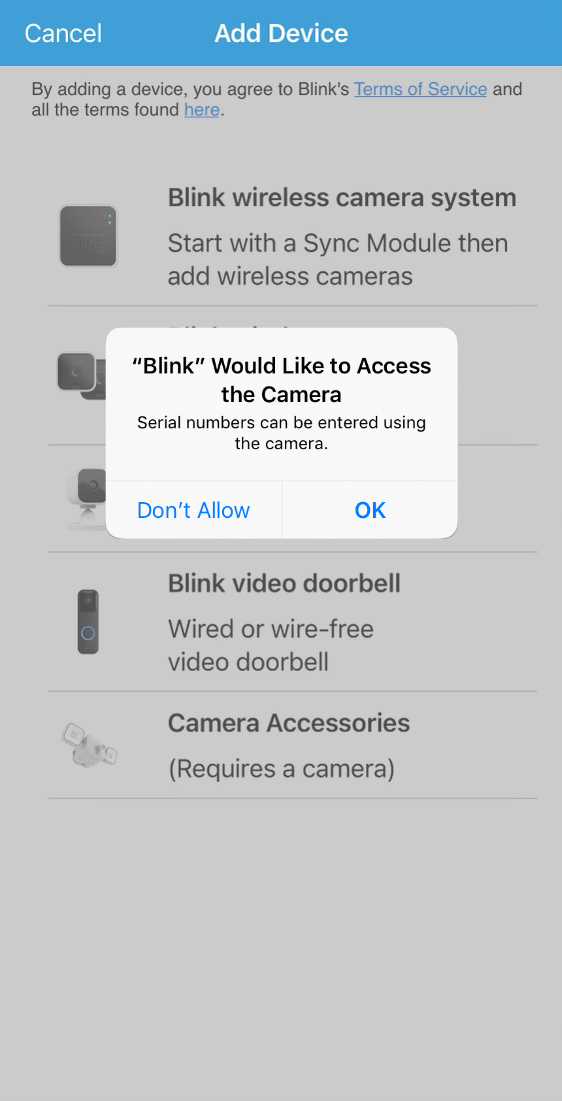
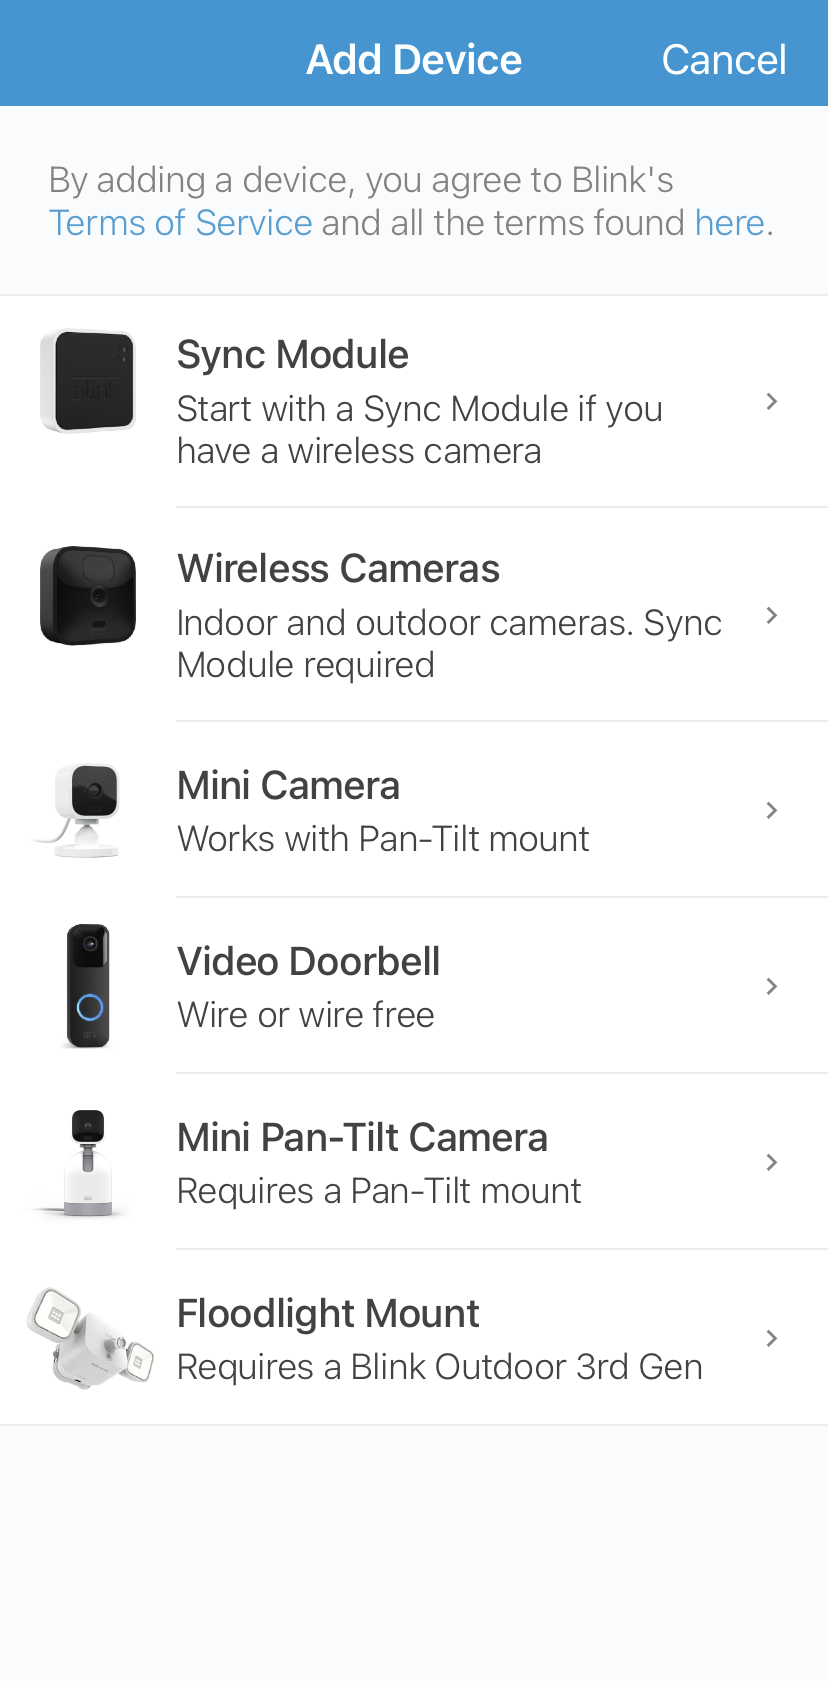
1. From the home screen, tap the Add Device + icon.
2. The Add Device screen displays your device options.

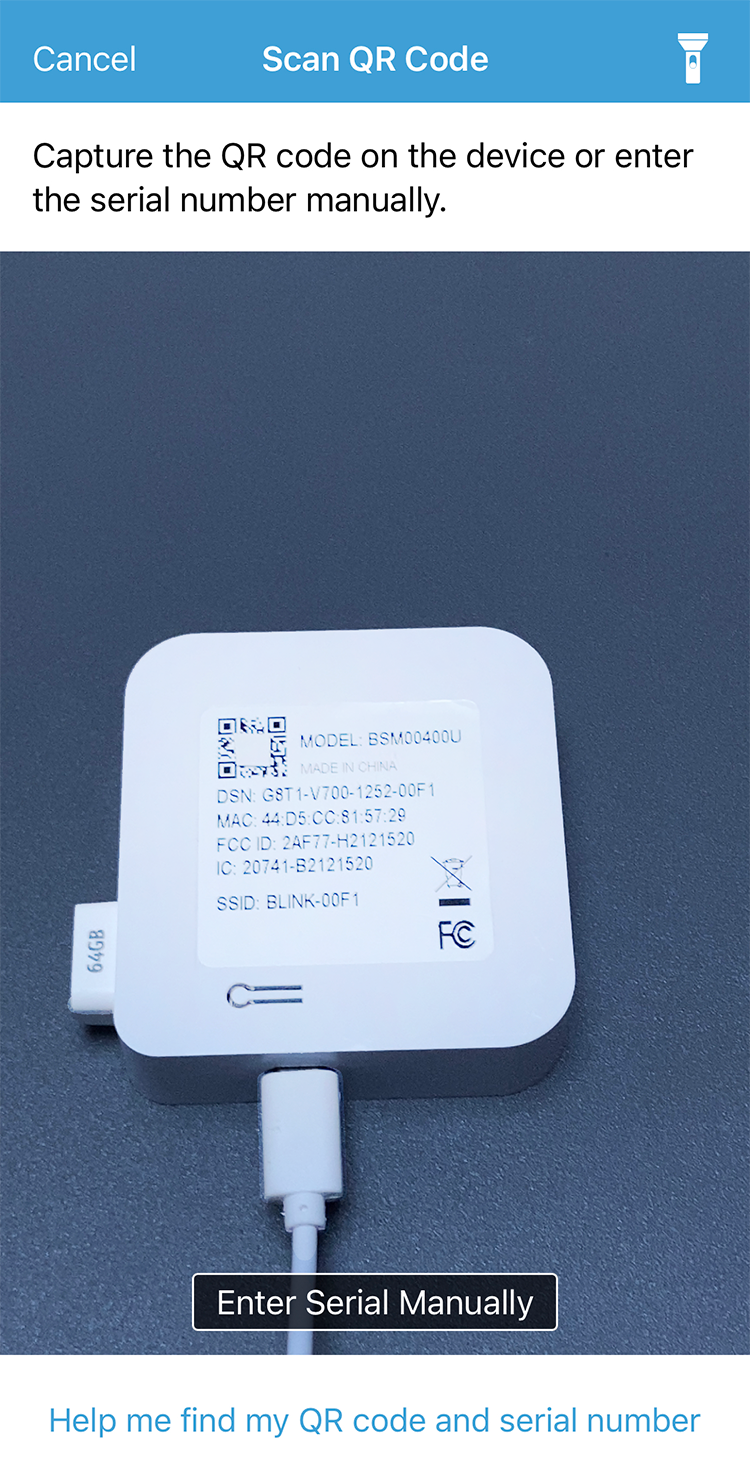
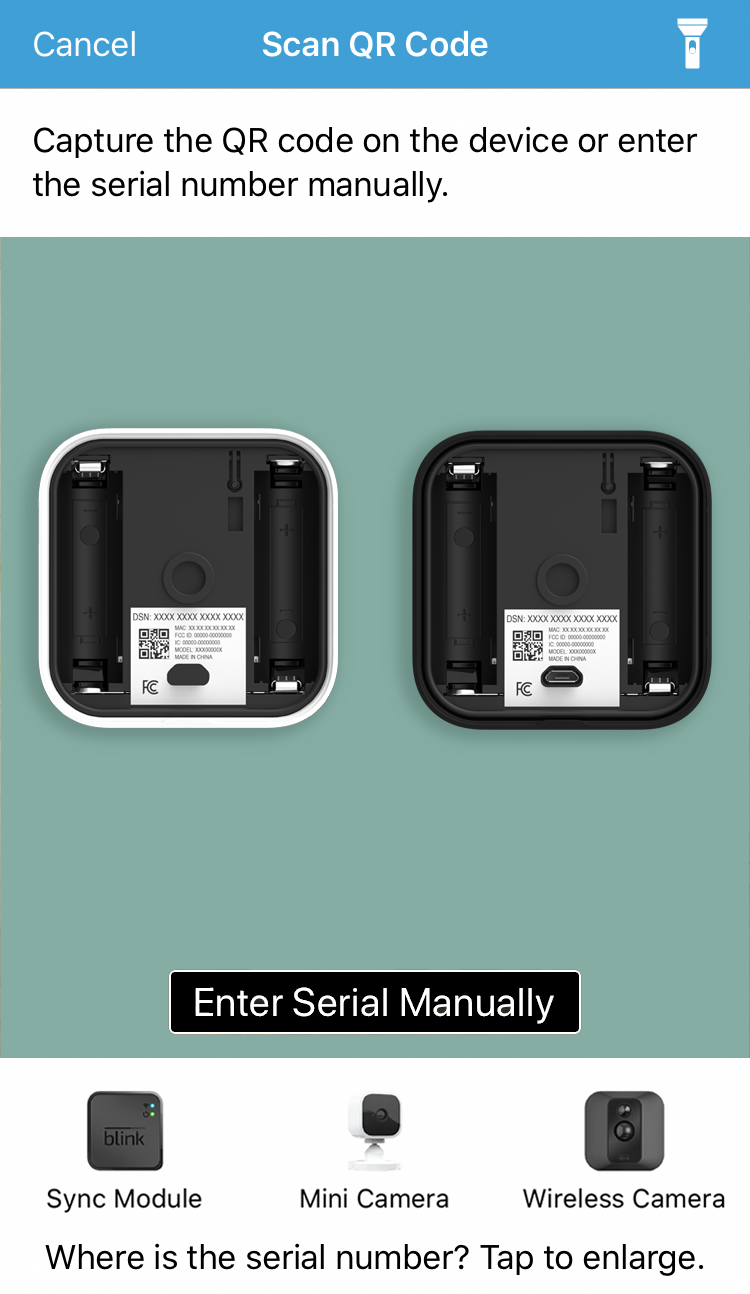
3. The serial number is also printed as a QR code. To scan a QR lawmaking, the Blink app requires permission to access the camera on your mobile device.
Tap OK to permit the Blink app to scan the QR code, automatically entering the serial number. If you lot prefer, y'all tin deny access to the camera by tapping Don't Permit and enter the series number manually.
To larn where the QR code and serial number are, tap the "Assistance me find my QR code and serial number" link at the bottom of the Scan QR Code screen.
4. When the QR code is recognized, you are asked to create a new system by borer the text entry box and providing a name. Tap "Done" to continue.

five. The Add Sync Module screen will instruct you to plug in your Sync Module and then expect for the calorie-free blueprint of
blinkingblue and
steadygreen.
When yous see the pattern on your Sync Module, tap Discover Device.
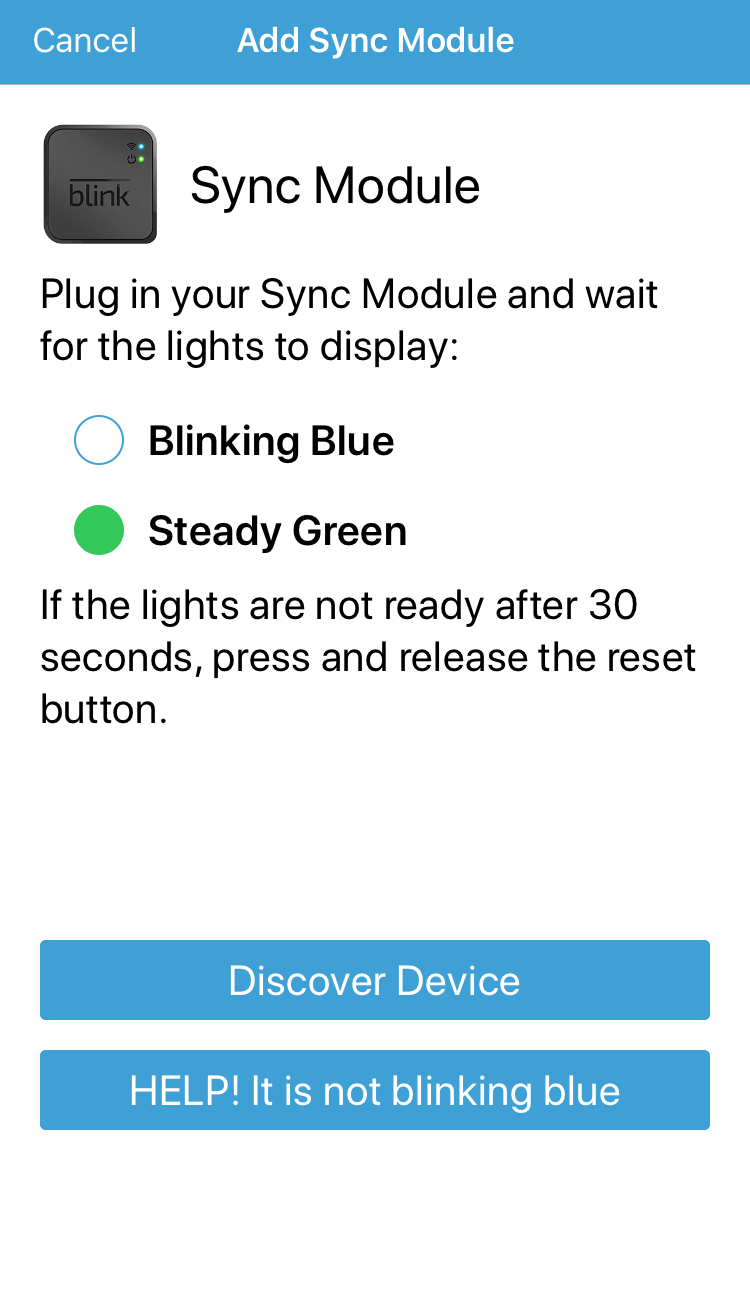
Note: If you don't run across the blinking blue calorie-free pattern, and then you may need to reset the sync module. Click for instructions to reset the Sync Module.
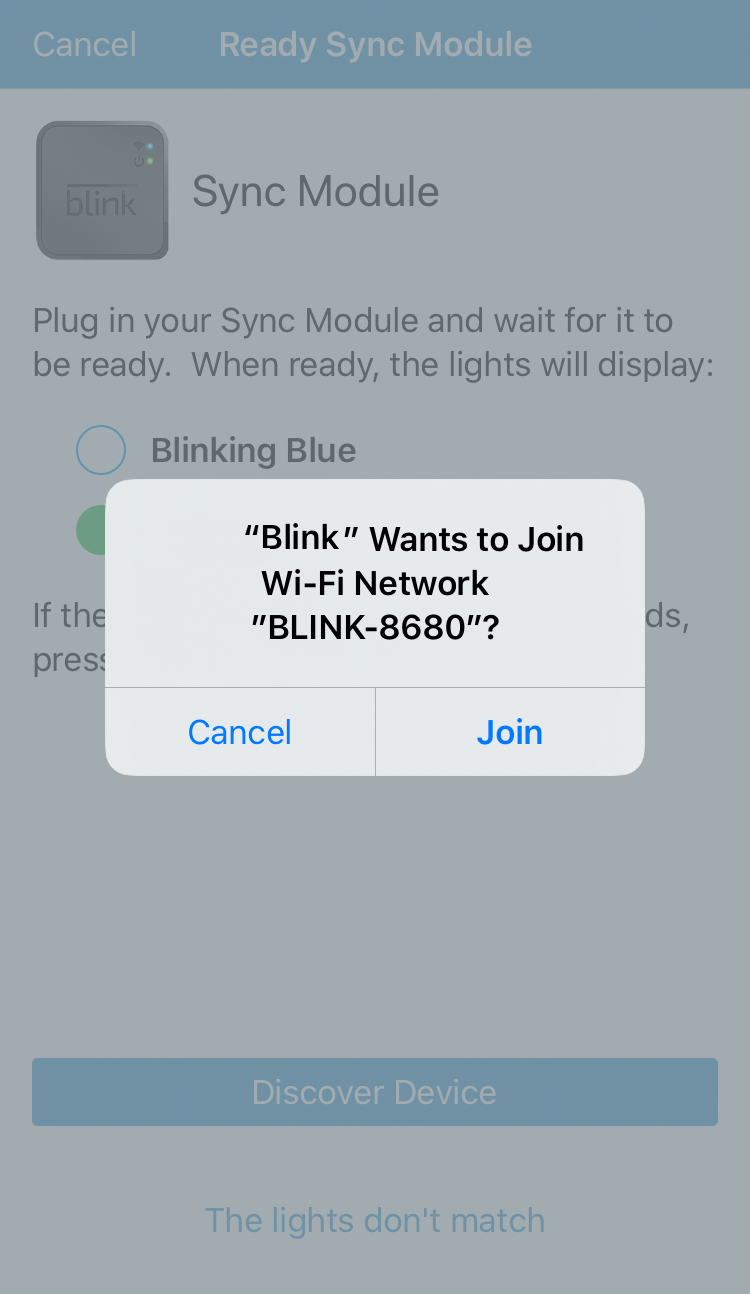
6. The Glimmer app needs to connect to the Sync Module'due south Wi-Fi network. Information technology is named "BLINK-" followed by iv digits from the Sync Module Series Number.
Tap Join, then you are asked to bring together your local Wi-Fi network.
seven. The Add Sync Module screen displays 2.4 GHz Wi-Fi networks within range. The Sync Module stores network data for devices that are added to its system. If you exercise non run across your local Wi-Fi network, tap Refresh List at the bottom of the screen. You can troubleshoot Wi-Fi connections hither.
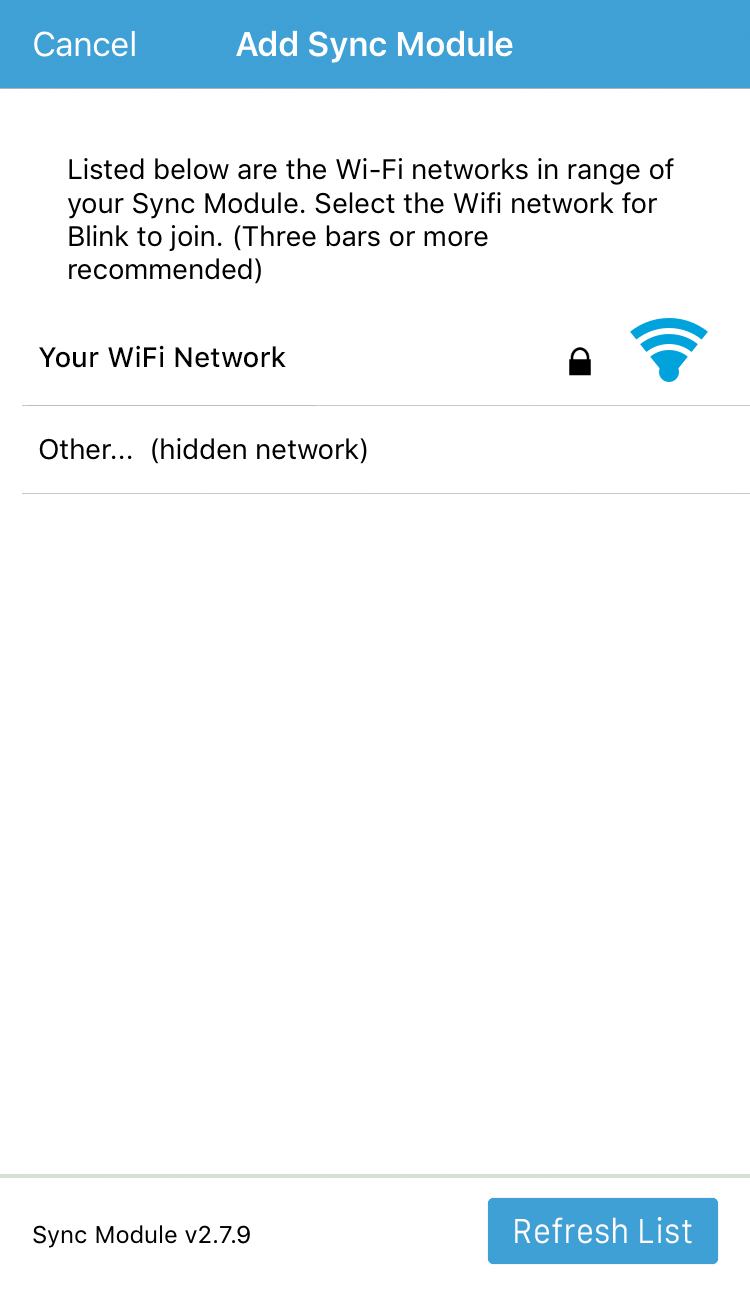
8. When you tap your Wi-Fi network proper noun, you are presented with a countersign entry field. Ensure that your password is right before y'all enter it. Incorrect password is a common cause of difficulty getting started. Tap Join to go along.

9. When network setup is complete, y'all are notified on the screen. Tap Doneto complete the install process and view the Blink app Welcome screen where you can now add a camera.

The system name should appear at the superlative of the Home screen. You are notified that the Sync Module has been added, the 'deject' icon shows a green connexion line indicating that the Sync Module is communicating with the Glimmer servers, and you can now tap the plus symbol + to add a device.

NEW: WiFi issues with setup, disconnections, or quality bug? Endeavour our new WiFi fixing app earlier contacting back up.*
![]()
![]()
*You volition be asked to provide a lawmaking before running the test. Enter in the code " BLNK ".
3. Adding Camera(s)
1. To add a Glimmer Indoor or Outdoor camera, tap the Plus symbol + on the app home screen.
2. Select the Glimmer wireless camera option.
three. Scan the QR code sticker, plant inside the dorsum cover.
Click hither for detailed instructions on removing the dorsum cover.
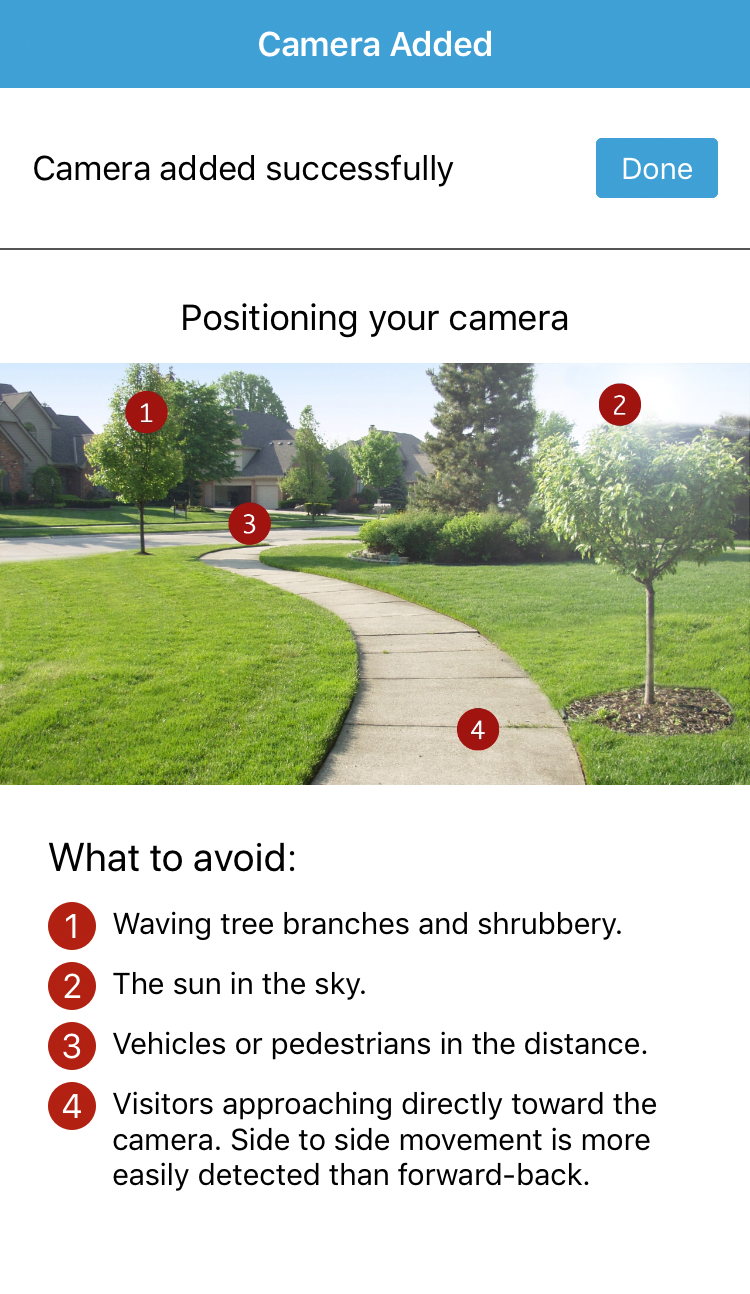
four. When the serial number is recognized, you lot are shown the photographic camera onboarding screen.
When the setup is complete and yous are notified of success, tap Done.
Click here if you receive an error "Unable to Connect to Sync Module" when adding cameras to a organisation.
If your Blink and Amazon accounts are not already linked, you will be prompted to link your device to your Amazon business relationship, by tapping on the Link Accountsbutton. This is necessary in order to accept full advantage of subscriptions, afterward the initial trial period expires. You besides accept the selection to select "Skip" which will take you to the home screen, without linking your accounts. Click here to learn how to link your Blink and Amazon accounts another fourth dimension.
So sign into your existing Amazon account or create a new 1 if needed. The link is then established between accounts and click Doneto go to the Home screen.
If you are unable to add a camera, please click here for troubleshooting steps.
Adjacent Steps:
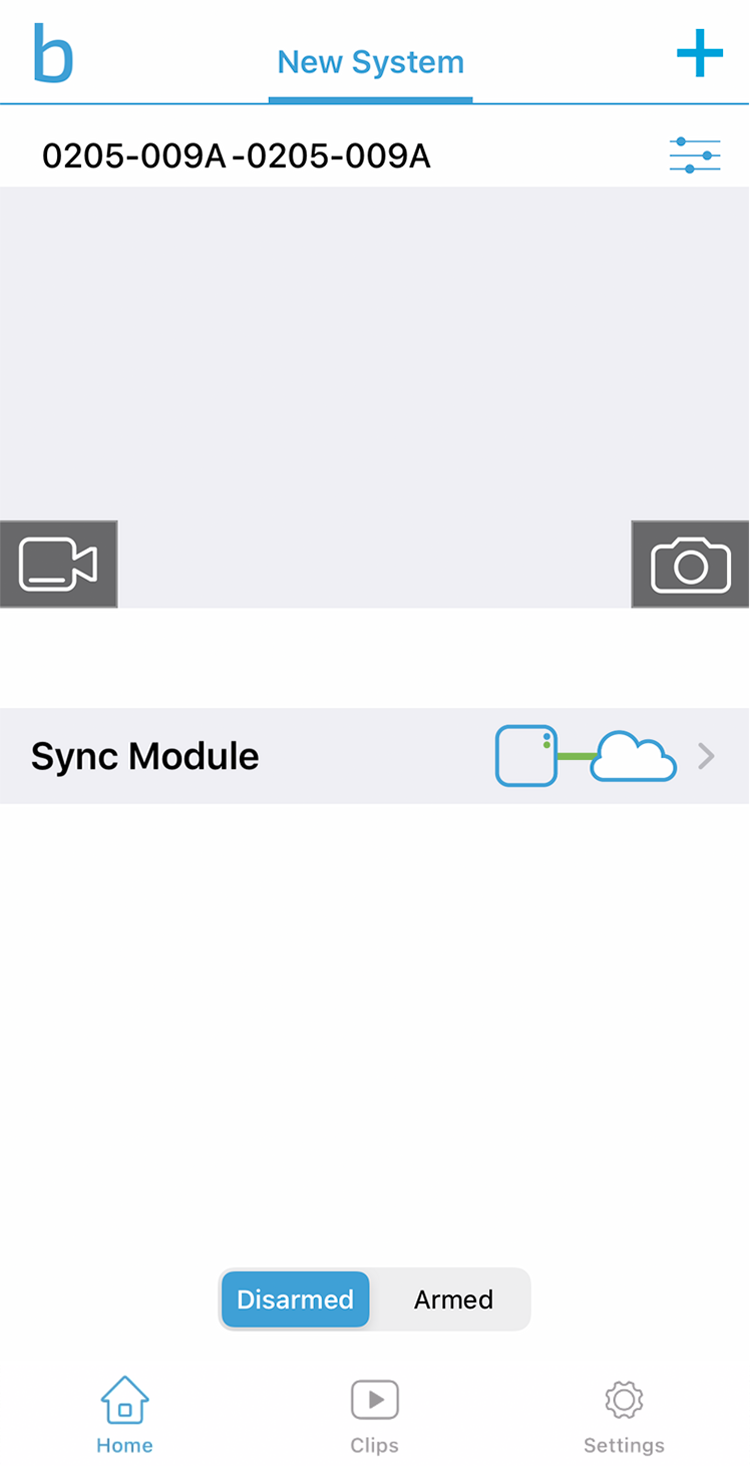
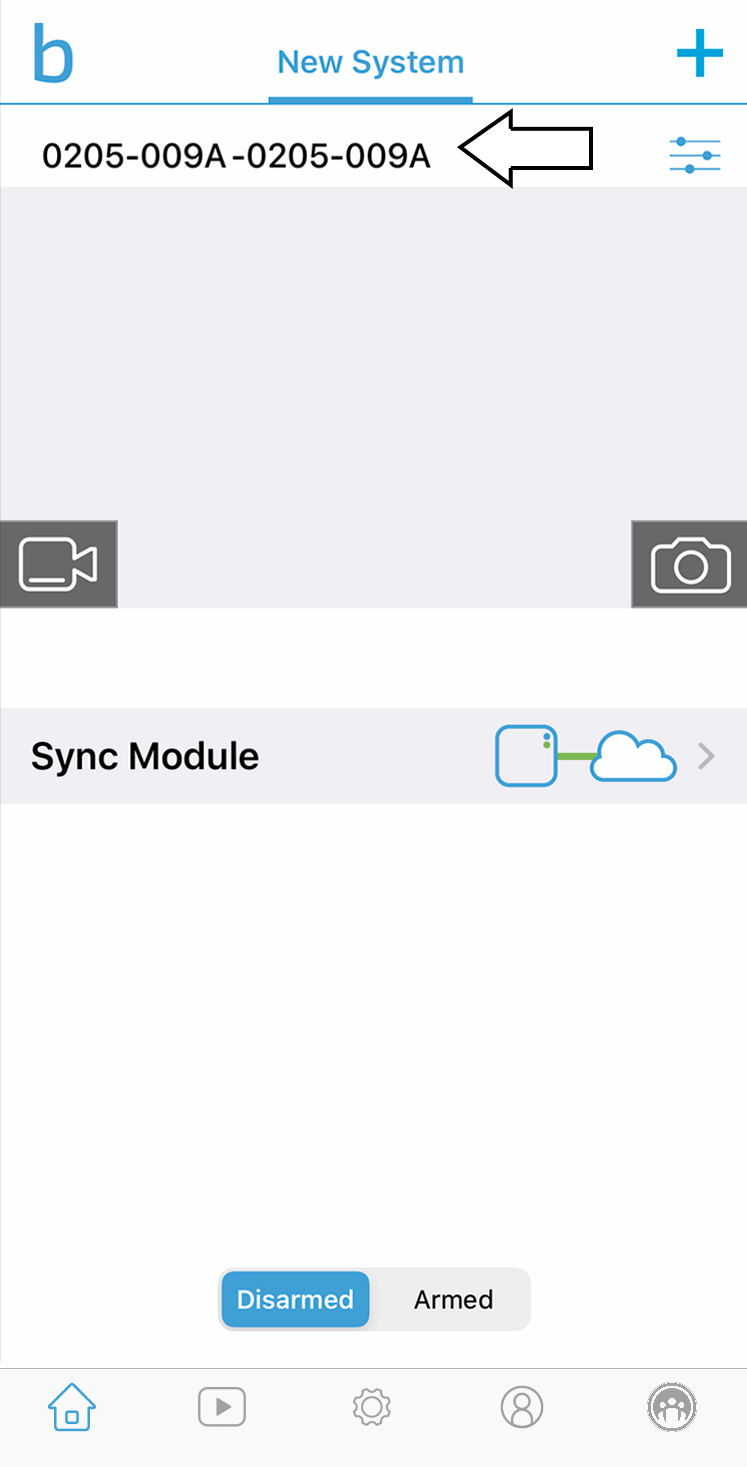
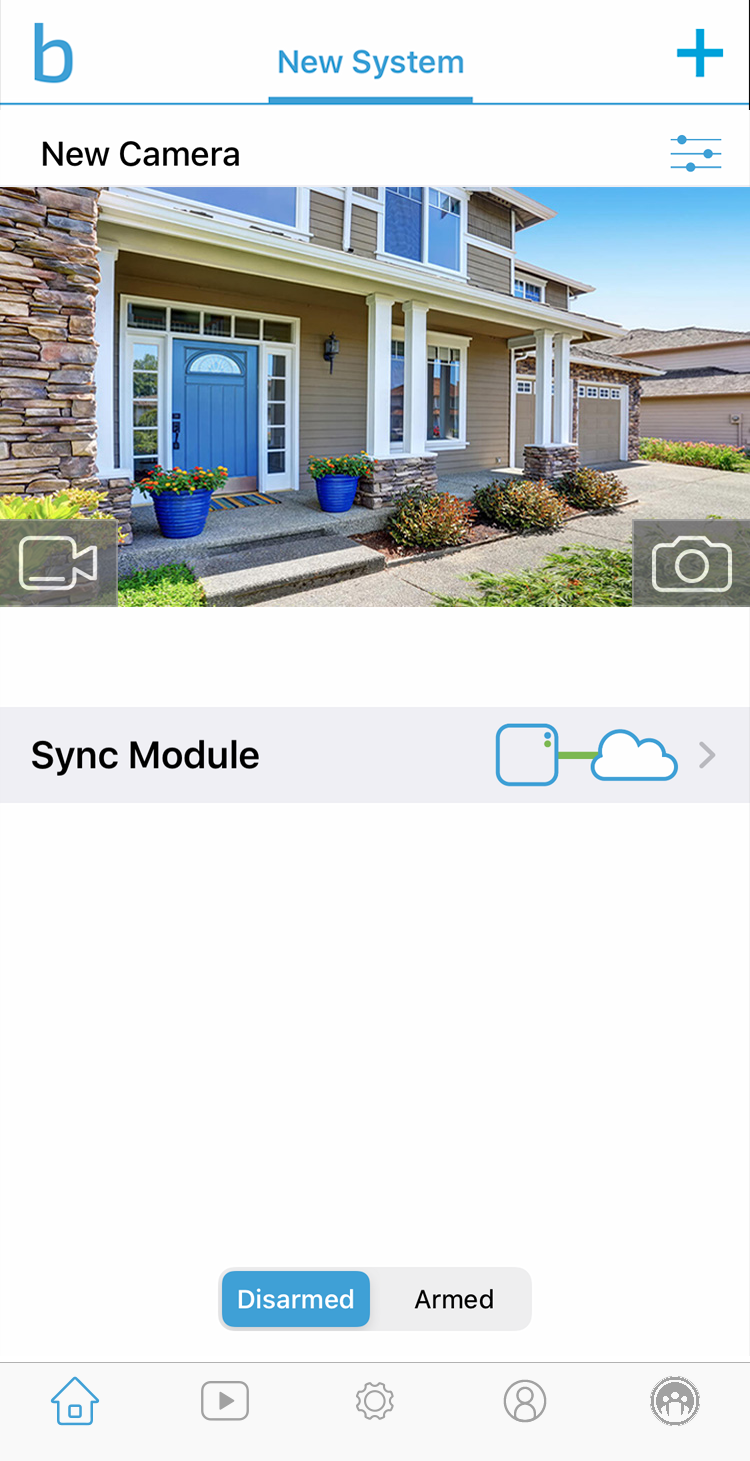
When a camera is first installed, the serial number is entered for the photographic camera name, and its thumbnail image is blank.
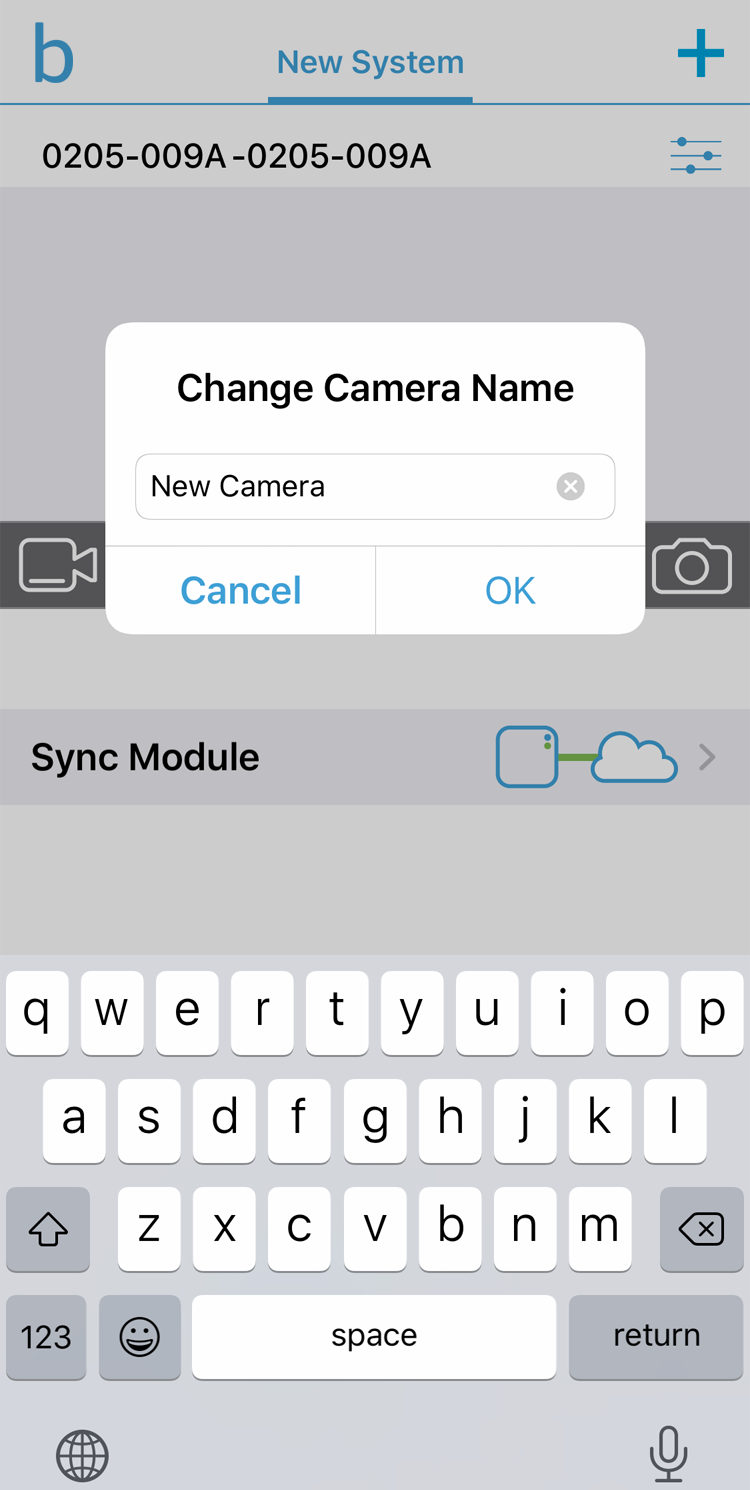
Tap the camera proper name to change information technology, enter the new name, and so tap OK to save.
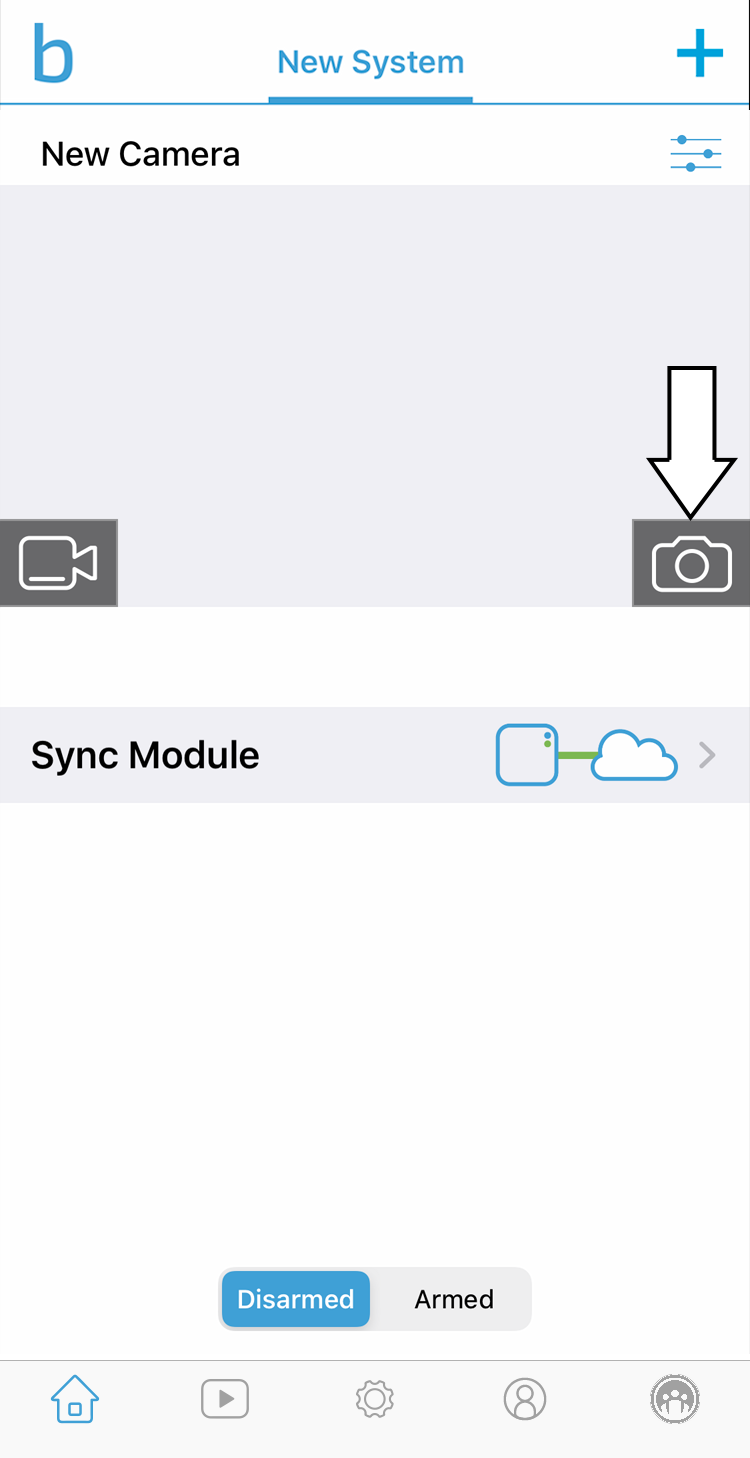
Tap the thumbnail icon to have a new thumbnail image. The thumbnail remains until y'all refresh it with this button. With a doorbell, the thumbnail image is refreshed when the ringer push button is pressed.
Click to learn more almost using the Blink app.
To add together more Blink cameras, tap repeat the steps in Office 3. Adding camera(s)

Now that yous have connected everything to your account, click to acquire about Camera Placement, or check out our Using Your Glimmer System for an introduction to using the Glimmer app and all of the features of your new Blink organisation like using Alive View, arming your organisation for motion alerts, and configuring notifications on your mobile device.

How To Set Up Blink App,
Source: https://support.blinkforhome.com/xt2-and-xt/how-to-set-up-blink
Posted by: ackerdameter.blogspot.com
0 Response to "How To Set Up Blink App"
Post a Comment